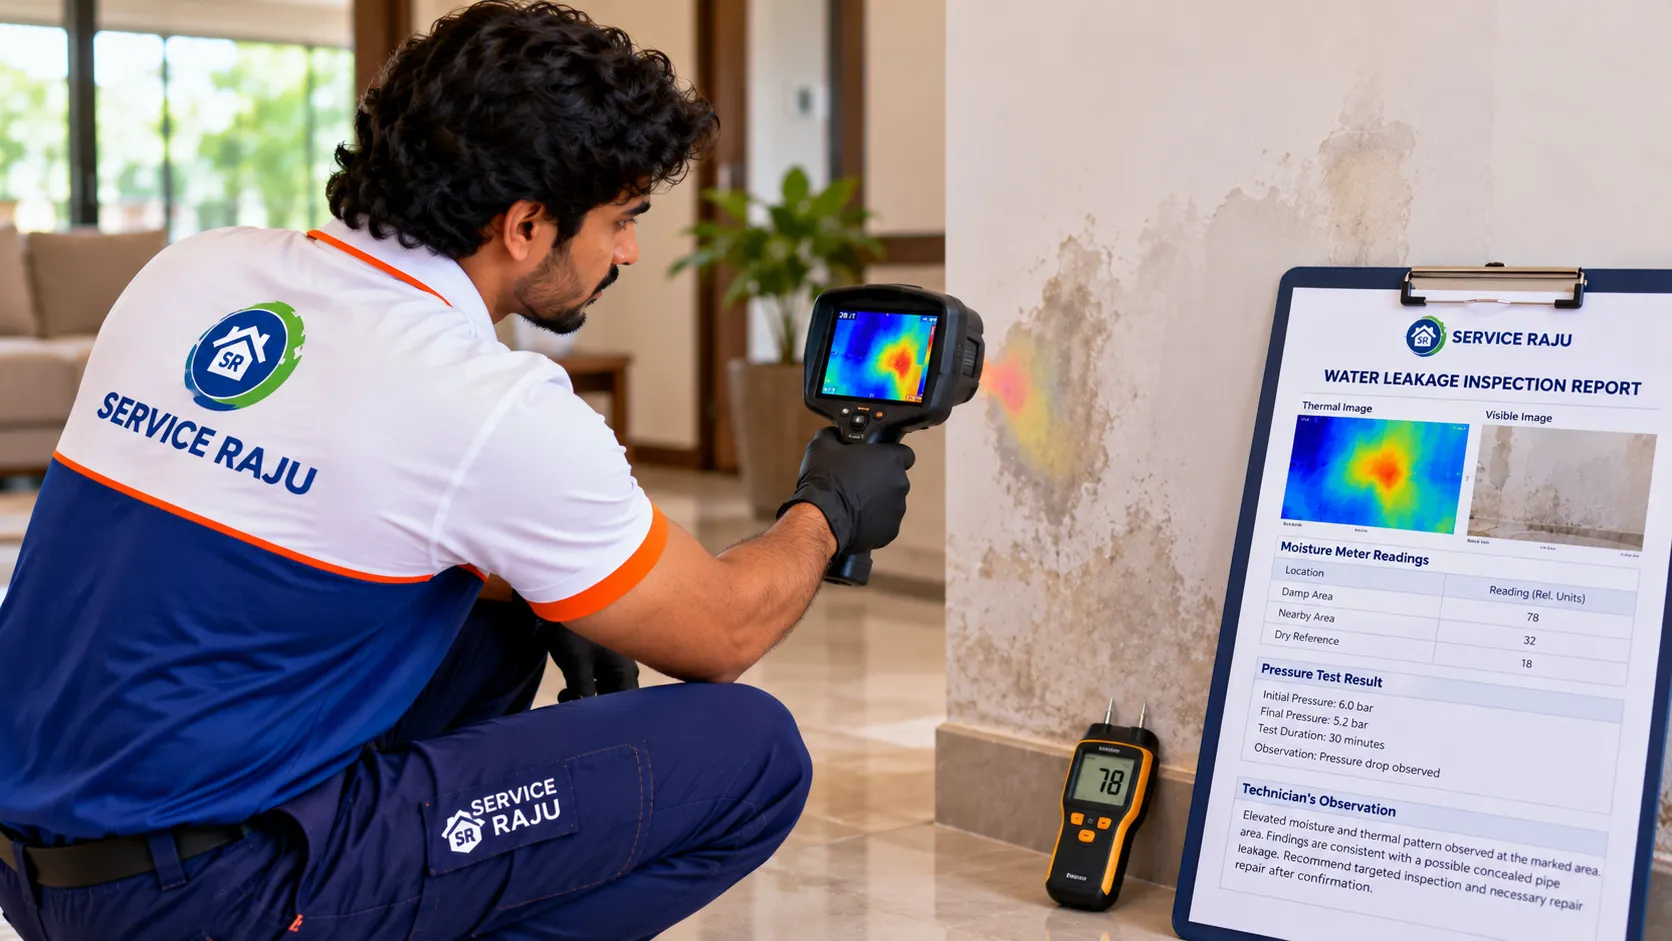
Water Leakage Inspection Report: What Do Thermal Images and Moisture Readings Mean?
Have you received a water leakage inspection report showing thermal images, moisture-meter readings or the results of a pipe test? You may be wondering: Does this prove there is a leak? Where exactly is the water coming from? And should you break the wall or remove tiles now?
A professional water leakage detection report helps document what the technician observed, which areas were checked, what the instruments indicated and what should happen next. It can narrow down a suspected problem—but no single thermal image or meter reading should automatically be treated as proof of a specific leaking pipe.
This guide explains how to read common inspection findings, understand their limitations and use the evidence to plan targeted repairs in Mysuru homes.
What Is a Water Leakage Inspection Report Meant to Establish?
An inspection report is a record of the assessment—not simply a collection of coloured images. A useful report should make clear:
- Where the concern was observed: for example, a damp patch on a bedroom wall, a ceiling stain or moisture near a bathroom.
- What was inspected: accessible surfaces, nearby plumbing, suspected pipe routes or other relevant areas.
- Which methods were used: visual inspection, thermal imaging, moisture measurement, pressure testing or other appropriate checks.
- What the instruments indicated: temperature patterns, relative or displayed moisture values, or test observations.
- What the findings suggest: a suspected source or likely explanation, with uncertainty stated where needed.
- What should happen next: further confirmation, targeted access, plumbing repair, drying or follow-up monitoring.
Reports may use terms such as “observed,” “consistent with,” “suspected” or “confirmed.” These words matter. An observation describes what was seen or measured; a suspected cause is an interpretation; confirmation requires evidence adequate for that particular conclusion.
What Does a Thermal Image Show?
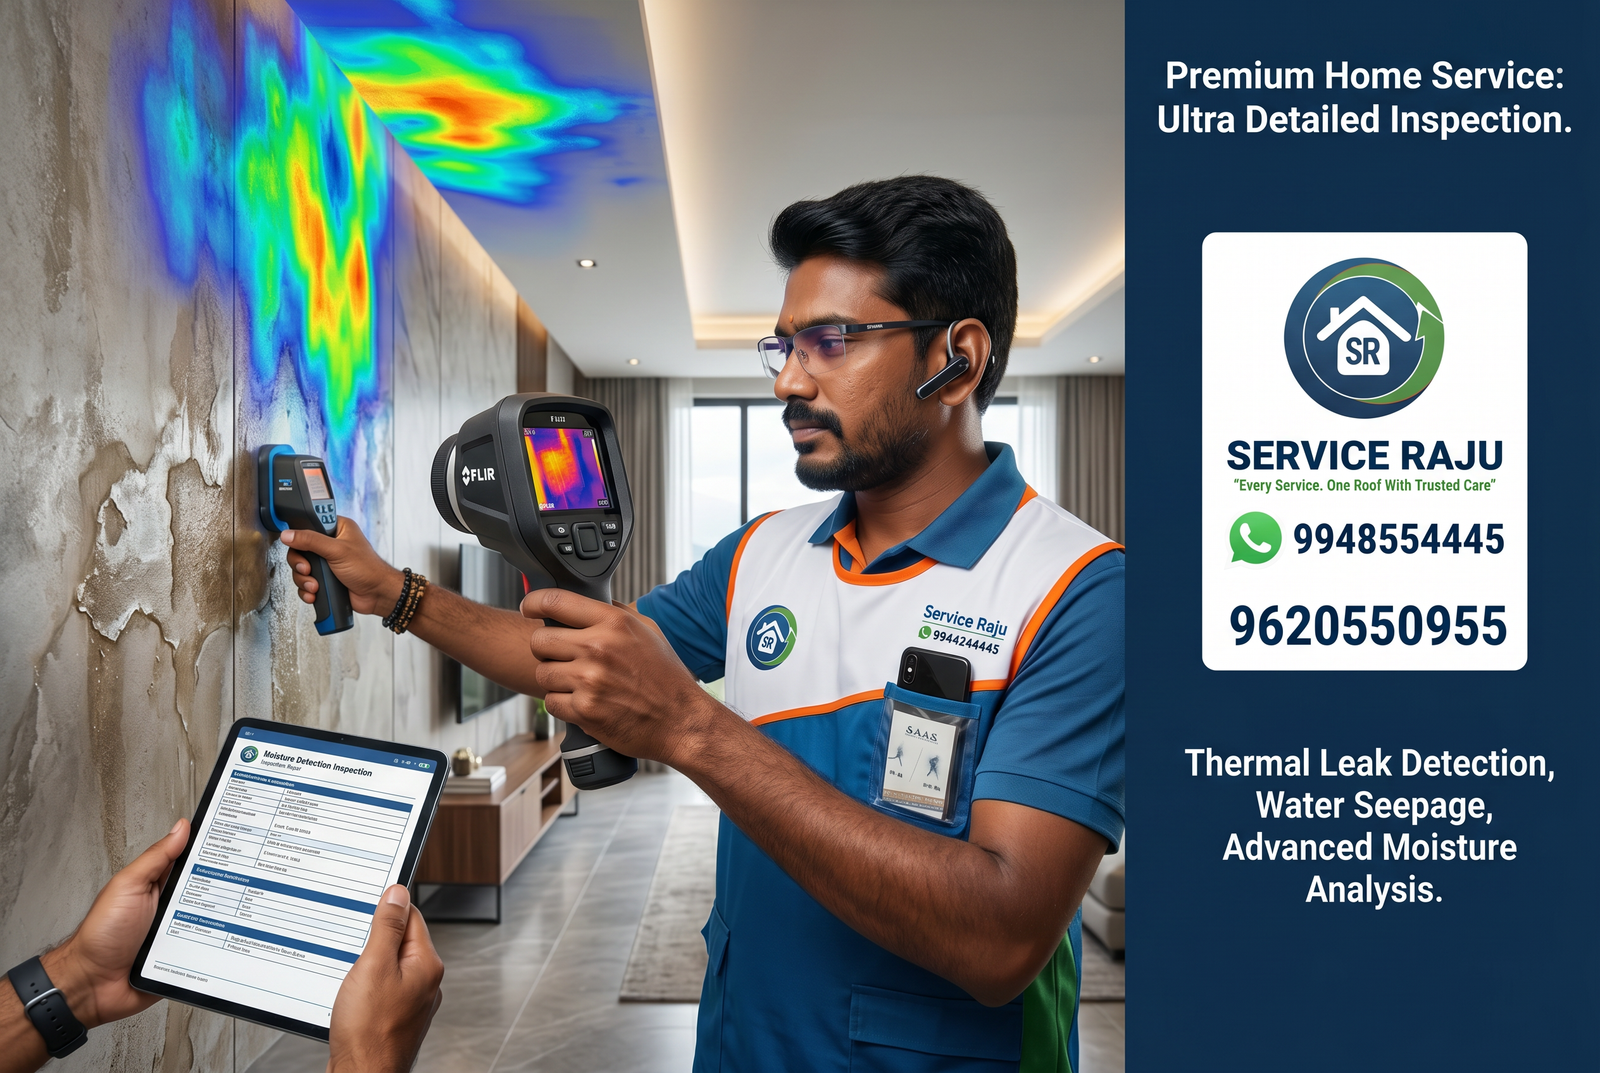
A thermal camera displays differences in the infrared radiation emitted by surfaces and converts them into an image of apparent surface temperatures. The colours—often blue, purple, yellow, orange or red—represent temperature differences according to the camera’s selected palette and scale.
In a leakage investigation, water may change a surface’s temperature because of evaporation, heat transfer, the temperature of the water or differences in the building materials. A thermal image can therefore help a technician identify an area that deserves closer examination.
How to read the image in your report
- Check the image location. Does the report identify the wall, room, ceiling or floor shown?
- Look for the temperature scale. Colours cannot be interpreted reliably without knowing the scale and image settings.
- Compare the pattern with the surroundings. A temperature difference may be meaningful, but it can also arise from sunlight, airflow, surface materials, plumbing temperature or other conditions.
- Check whether a normal photograph is included. A visible-light image helps connect the thermal pattern to the actual surface and its features.
- Read the technician’s interpretation. The report should explain why the pattern is relevant and what additional check, if any, supports the suspected cause.
What a thermal image does not prove by itself
A thermal image does not directly show water flowing inside a concealed pipe. A cool or warm patch is not, on its own, proof of a leak, the exact pipe location or the point where a pipe has failed.
Thermal readings can be affected by surface emissivity, reflections, recent heating or cooling, ventilation, sunlight and differences in construction. A competent assessment considers these factors and combines thermal observations with other evidence.
Practical takeaway: Treat the thermal image as a clue that helps direct the investigation—not as a standalone verdict.
How to Interpret Moisture-Meter Readings
A moisture meter helps assess moisture conditions in a material. Depending on the instrument, it may use pins that contact or penetrate the material, or a pinless sensor that responds to conditions beneath the surface. Different meters and modes may display different kinds of values.
Before interpreting a reading, check the report for the meter type, measurement mode, material being assessed and the locations where readings were taken.
Relative readings versus material-specific readings
Some meters display a relative or comparative scale. A higher number may indicate a stronger moisture response on that instrument, but it may not mean a particular percentage of water in the wall.
Other instruments provide material-specific values or calibrated moisture estimates. Even then, the result depends on the material, the meter’s calibration and the measurement conditions. Do not compare values from different devices as if they were interchangeable.
Why a series of readings can be more useful than one number
A technician may take readings at the visibly damp area, nearby areas and a comparison location that appears dry. The pattern can help determine whether moisture is concentrated, widespread or changing across the surface.
| Report finding | What it may suggest | What still needs consideration |
|---|---|---|
| Higher reading at the stain than at nearby comparison points | The area may contain more moisture or produce a stronger meter response | Material type, meter mode, salts, metal and other factors that may affect the reading |
| Similar readings across a broad area | Moisture may be widespread, or the surface may have characteristics affecting the meter | Whether the readings are consistent with the material and the visible condition |
| Readings change during repeat visits | The moisture condition may be changing | Whether drying, weather, water use or a repair explains the change |
| Low reading at one test point | That location may have a lower meter response at the time of testing | A single point does not rule out moisture elsewhere or a leak that is intermittent |
A moisture meter can help map and monitor a suspicious area, but a reading alone usually cannot identify the water source. The report should explain how the readings relate to the visual and thermal observations.
What Does a Concealed Pipe Pressure Test Tell You?
When a concealed water-supply pipe is suspected, a suitable pressure test may help assess whether the isolated pipe system holds pressure under the test conditions. The procedure should be selected and performed by a qualified person using appropriate equipment and safe limits for the pipework.
A report describing a pressure test should ideally state:
- Which pipe or plumbing section was tested and how it was isolated.
- The initial test pressure and the pressure observed over the test period.
- The duration and relevant test conditions.
- Whether the result was stable, changed or could not be interpreted reliably.
- Any limitations, such as connected fixtures, valves or system conditions that affected the test.
How to understand the result
A pressure drop may be consistent with leakage, but it can also be influenced by temperature changes, trapped air, test setup, valve condition or other factors. The test must be interpreted according to the plumbing system and procedure used.
A stable result means that pressure was maintained under the specific test conditions. It does not necessarily rule out every possible leak—for example, a leak on a different pipe section, a drain line, a waterproofing layer or a leak that occurs only under different conditions.
Safety note: Do not attempt to pressure-test concealed plumbing yourself using improvised equipment or pressure beyond the system’s rating. Ask the technician what was tested and what the result can reasonably establish.
How the Findings Fit Together
The strongest conclusion usually comes from interpreting multiple findings together rather than relying on a single instrument.
| Evidence combination | Possible interpretation | Reasonable next step |
|---|---|---|
| A visible damp area, a matching thermal anomaly and higher comparative moisture readings | The area warrants further investigation for a moisture source | Check nearby plumbing, water-use patterns and other plausible sources |
| Moisture evidence near a suspected supply-pipe route and an abnormal result on a properly conducted isolated pipe test | A supply-pipe leak may be more likely | Confirm the tested section and plan targeted access or further diagnosis |
| Dampness below a bathroom, but no clear evidence from the supply-pipe test | The source may involve drainage, joints, wet-area use or waterproofing rather than the tested supply line | Investigate the relevant bathroom, drain and waterproofing conditions |
| A thermal anomaly without corroborating moisture or plumbing evidence | The pattern may have another explanation, or further testing may be needed | Review environmental conditions and repeat or supplement the assessment if appropriate |
These are examples, not universal diagnostic rules. The appropriate conclusion depends on the building, pipe layout, instruments, test conditions and the evidence actually recorded.
What Should Be Confirmed Before Breaking Tiles or Opening a Wall?
Before authorising invasive repairs, use the report to ask practical questions:
- What is the suspected source? Is it a supply pipe, drain, fixture connection, waterproofing issue, external seepage or another possibility?
- What evidence supports that conclusion? Ask how the thermal pattern, moisture readings, visual observations and any test results fit together.
- What area needs access? Ask whether the report identifies a likely inspection or repair zone, and how precise that location is.
- Is another check appropriate first? Depending on the case, the technician may recommend additional testing or observation before opening the surface.
- What is the proposed repair? Confirm what will be repaired, what materials or fittings are involved and whether reinstatement of tiles, plaster or paint is included.
- How will the repair be verified? Ask what follow-up test or observation will be used to check the result.
A report may narrow down the likely area without identifying an exact break point. Make sure the repair plan reflects the confidence and limitations stated in the report.
How to Check Whether the Repair Worked
After the repair, the technician or plumber may repeat an appropriate test, check the repaired section for leakage and review whether the original moisture condition changes. The method depends on the suspected source and repair type.
Remember that a wall or ceiling can remain damp after the source has been stopped. Drying time varies with the material, thickness, ventilation, temperature and how much water entered the area. A remaining stain or elevated reading immediately after repair does not automatically mean the leak is still active.
Ask for the follow-up findings to be documented. If moisture persists, the next step may be further drying, monitoring or renewed investigation—not necessarily another immediate opening of the wall.
What a Useful Inspection Report Should Include
When reviewing a report, look for these elements:
- Customer and inspection-location details.
- Date of inspection and areas examined.
- Clear photographs linked to the location inspected.
- Thermal images with enough context to interpret the patterns.
- Moisture readings with measurement locations and relevant instrument information.
- Details of any pipe test, including the tested section and observations.
- A clear distinction between observed evidence, likely explanation and confirmed findings.
- Recommended next steps and stated limitations.
Water Leakage Inspection in Mysore: Service Raju
Need clarity before repairing a damp wall, ceiling or concealed pipe? Service Raju provides water-leakage detection support using appropriate inspection methods, which may include thermal imaging, moisture assessment and plumbing tests where suitable.
When enquiring, share where the dampness appears, when it started, whether it changes with water use or weather, and any previous inspection findings. The inspection method and scope should be confirmed for your specific case.
Book or enquire: Service Raju — Water Leakage Detection
Call: +91 99645 44445 | +91 96205 50955
Service Raju — Trusted Home Services in Mysuru, Udupi, Mangaluru & Indore.
Frequently Asked Questions
Does a thermal image prove there is a water leak?
No. A thermal image shows apparent surface-temperature patterns. Moisture may contribute to a pattern, but other conditions can also cause temperature differences. The finding should be interpreted alongside visual observations, moisture measurements and appropriate tests.
What does a high moisture-meter reading mean?
It indicates a stronger response or higher estimated moisture according to that meter’s mode and calibration. The meaning depends on the material, instrument and measurement location. Ask whether the value is relative or a material-specific estimate.
Can a pressure test locate the exact concealed pipe leak?
A pressure test may help assess whether a tested pipe section holds pressure, but it does not necessarily pinpoint the exact failure location. Additional inspection or targeted access may be needed.
If the pressure test is stable, does that rule out every leak?
No. It applies to the section and conditions tested. A leak may involve another section, a drain, a fixture, waterproofing or a condition not reproduced during the test.
Should I break the wall as soon as the report shows a suspicious thermal patch?
Not automatically. First ask what evidence supports the suspected source, how precise the proposed access area is and whether another non-invasive or limited check is appropriate. The repair plan should match the report’s confidence and limitations.
Why is my wall still damp after a leak has been repaired?
Building materials can retain moisture after the water source is stopped. Drying depends on the material, the amount of water and the environment. Follow-up readings and observations can help distinguish ongoing leakage from residual dampness.
Conclusion
A water leakage inspection report is most useful when it explains what was observed, how the instruments were used, what the findings suggest and what remains uncertain. Thermal images can identify temperature patterns, moisture meters can help assess damp areas, and suitable pressure tests can provide evidence about a tested pipe section—but each method has limits.
Before opening tiles or walls, ask how the evidence supports the proposed repair and how the result will be checked afterward. A careful, evidence-led approach can help you plan more targeted repairs and avoid treating an unconfirmed cause as fact.
Need help interpreting suspected leakage? Contact Service Raju about water leakage detection in Mysuru.
 AC Repair
.webp) Ant Control Service
Ant Control Service
 Basin & Sink Services
.webp) Bath & Shower Services
Bath & Shower Services
.webp) Bath Fittings & Mirrors
Bath Fittings & Mirrors
 Bathroom Cleaning Service
 Bathroom Renovation Services
 Bed Bug Control Services
 Bedroom Painting
 Book a Carpenter Consultation
 Book Electrical Consulting
.webp) Cabinet Painting & Wood Refinishing
Cabinet Painting & Wood Refinishing
 Chimney Cleaning
 Civil Masonry Work
 Clean-Up Services
.webp) Clothes Hanger Installation
Clothes Hanger Installation
 Cockroach Control Services
---mysore-mysore-standard-300x200.webp) Commercial Cleaning
Commercial Cleaning
 Commercial Pest Control AMC Service
 Cupboard & Drawer Services
 Decorative Wall Panels
 Deep Sanitisation Service
 Detan & Bleach
 Door, Grill & Cabinet Painting Service
.webp) Doorbell & security
Doorbell & security
 Drain Blockage Clearing
 Electrical Appliance Services
 Electrical Wiring Services
 Empty Home Deep Cleaning
.webp) Fabrication
Fabrication
 Facials
.webp) Fan Installation & Repair
Fan Installation & Repair
 Full Home Cleaning Service
 Full Home Renovation
 Furniture Repair Service
 Gas Stove & Hob Repair
.webp) General Pest Control Services
General Pest Control Services
 General Plumbing & Consultation
 Geyser Repair
 Glass Cleaning
 Head Massage
.webp) Honeybee & Wasp-Services
Honeybee & Wasp-Services
 Kitchen & Bathroom Painting Service
 Kitchen Cleaning
 Kitchen Fittings
.webp) Kitchen Renovation
Kitchen Renovation
.webp) Laptop/Desktop service
Laptop/Desktop service
 Leak Detection and Repair
 LED TV Repair
 Living and Dining Room Painting
 Makeup, Saree & Styling
 Manicure & Pedicure
 MCB,Meter & Fuse Services
 Microwave Repair
 Mosquito Pest Control Service
 Multi-Room Painting Service
 Painting Consultation
 Quick Mini Cleaning Services
 Refrigerator Repair
 RO Water Purifier
.webp) Rodent Control Services (Rat & Mice Treatment)
Rodent Control Services (Rat & Mice Treatment)
.webp) Rooms Cleaning
Rooms Cleaning
 Shelves & Decor
 Sofa, Carpet & Mattress Cleaning
 Solar Water Heater Service
 Sump & Tank Cleaning
 Switch & Socket Services
 Tap & Mixer Service
.webp) Termite-Control-Services
Termite-Control-Services
 Threading & Face Wax
.webp) Tile & Granite Installation & Polishing
Tile & Granite Installation & Polishing
 Toilet & Commode Services
.webp) UPS and Inverter Repair Services
UPS and Inverter Repair Services
.webp) Wall Painting Service
Wall Painting Service
 Washing Machine Repair
 Water Level Controllers
 Water Tank and Pump Repair
 Waterproofing
 Waterproofing Services
 Waxing
 Window & Curtain Services
 Wooden Door Services